Gas furnace service sheet
Above is a step by step service sheet that will be applicable to most gas furnaces.
If you do not understand parts of this service, I will try to have references to videos that may help.
Beginning with #1, When first entering the house, take a look at the thermostat. Be sure it is level and tight against the wall. Leveling the thermostat is not necessary for newer electronic thermostats, but it looks better that way.
Also be sure the thermostat is tight against the wall. Some customers are not very mechanical, and if the thermostat is loose will be afraid to fix it. Do it for them.
Also, you need to set the temperature well above the ambient temperature. Do not set the temperature 2 or 3 degrees above ambient. Set it all the way up. You do not want it shutting off while you are doing the service.
#2. Check filter. Do not overlook this. A dirty filter may cause the furnace to shut off during the service with you not knowing why. Also, it is part of the job you were sent there to do. You may need to remind the customer to keep his filter clean.
#3. Before beginning the service, you should be doing a Carbon Monoxide test to be sure the furnace is safe to operate. There is no point in servicing a furnace that has a cracked heat exchanger and needs to be replaced.
#4. Here is where we check the flame safety control to be sure all the flame safeties are working.
There are a number of types of flame safeties out there with the type depending on the age of the furnace.
a. If the furnace is an older one, it may have a pilot light. Look at the pilot light. Is it blue and a little ruffled? This is how it should look. If it is yellow and lazy, the pilot burner may be plugged. Here is a video on the pilot light.
b, Check pilot dropout. This test determines if the gas valve will shut off the gas to the main gas and the pilot if the pilot goes out. It should drop out within 3 minutes.
Blow out the pilot light with the power to the furnace off. You should hear a "click". That is telling you the pilot safety has shut down.
c, Once the pilot safety has shut down, try to relight the pilot. The pilot should not relight when the safety has shut off. If it does light, the gas valve has failed and must be replaced.
d, Newer furnaces may use a Hot Surface ignitor to light the main burner. This control system is much different than the pilot safety.
It uses an electronic circuit to prove the flame has come on.
The hot surface ignitor is subject to cracks. Cracks are sometimes visible as a white spot on the ignitor. Also, the ignitor will have a hot spot when on that shows up as a bright spot.
e, Another test of the ignitor is an ohm test. In this one you isolate the ignitor and check its resistance. For most ignitors, 150 ohms is the upper limit with normal at around 60 to 80. As the resistance increases, it means the ignitor is cracking.
The video below covers this test.
The video below covers this test.
f, Most newer furnaces use a flame rod that is mounted in the flame on the opposite burner from the hot surface ignitor to prove that the flame has lit.
This rod must sense flame within 10 to 16 seconds of when the gas valve opens.
This is just a stainless steel rod and after some time in service, will get deposits on its surface that may inhibit its ability to sense flame.
You must have a microamp meter to test this part.
I recommend testing the flame rod at the beginning of the service. Record the findings.
The video below explains how this part works.
g, Clean the flame rod with sandpaper, steel wool or any other light abrasive.
Fire off the unit and recheck the flame rod microamps. Compare the 2 readings.
h, Test the flame safety by shutting of the gas supply and starting the unit. The hot surface ignitor should warm, then the gas valve will open. You should be able to hear the gas valve solenoid open. After the 10 to 16 seconds, the gas valve will close.
This should repeat 3 times with a purging period in between to clear out the unburned gas.
After the third try, the unit should shut down and blink a code that indicates it shut down from flame failure.
This tests the flame safety control to be sure it works properly.
Any failure here indicates the control board must be replaced.
5, Clean the burners.
On older furnaces there will be ribbon type burners like the ones below.
On older furnaces there will be ribbon type burners like the ones below.
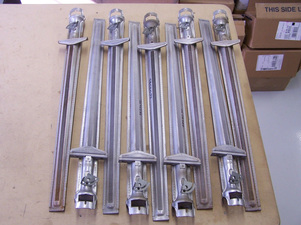
They need to removed and cleaned.
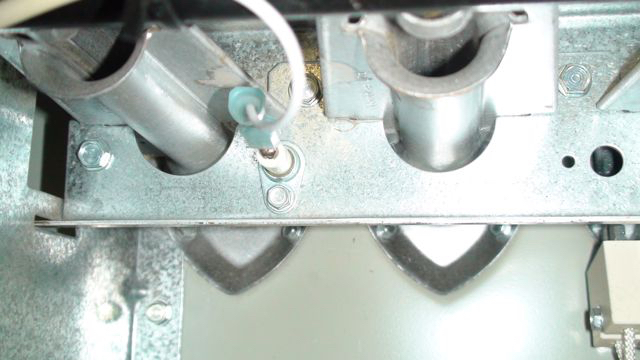
Newer furnaces use inshot burners. The do not always need to be removed. They can usually be cleaned in place with a toothbrush. Check for rust on all burners. Replace as necessary. Below are inshot burners.
Newer furnaces use inshot burners. The do not always need to be removed. They can usually be cleaned in place with a toothbrush. Check for rust on all burners. Replace as necessary. Below are inshot burners.
6, Check heat exchanger for cracks. The heat exchanger is the metal barrier between the burning gas and the circulating air.
This may be more complicated than it seems. There is a section that gives more explanation of heat exchangers. Check here
7, This test is done to be sure the heat exchanger is intact. You may have missed a crack. Fire of the furnace. The burners will come on. After 30 to 45 seconds, the circulating fan will come on.
When the fan comes on, if there is a crack, the flame may change because of the circulating air mixing with the burning gas. If the flames changes, rolls out the front or goes out in one burner, you probably have a crack.
If this happens, you must go farther to determine where the crack is.
When the fan comes on, if there is a crack, the flame may change because of the circulating air mixing with the burning gas. If the flames changes, rolls out the front or goes out in one burner, you probably have a crack.
If this happens, you must go farther to determine where the crack is.
8, This test is only used on gas furnaces that are quite old. They do not have an inducer. They used a draft hood to control the negative pressure in the vent. When the furnace is running, a lit match is moved around the entire circumference of the draft hood inlet. The match should always pull into the opening. If the match goes out at any portion of the opening, the draft is not working properly. This means the venting is not pulling all the burned gasses out of the structure. If this happens, the venting must be checked for blockages or the structure may have a negative pressure that will not let the gasses out. The video below explains the operation and troubleshoot of the draft hood.
9, In this one we must check the operation of the circulating fan.
Amp draw must be taken and compared to the RLA of the motor.
When checking the motor amp draw, the capacitor, (if used) should be checked to be sure if the strength is within normal limits.
10, The bearings should be checked to see if they are stiff or there is too much clearance in the bearings.
The video below covers the test of the circulating fan motor.
11, If the fan is a belt drive, the belt should be checked and adjusted. If the belt is cracked, it should be replaced. A video about belt condition is below.
The belt should be adjusted to have enough tension to drive the blower, but on residential units not enough to damage the bearings.
12, Clean the blower wheel and motor. This simply involves removing the blower wheel and cleaning the slots of the wheel. The air holes in the motor should also be cleaned with a toothbrush.
If the furnace is a 90% efficient one, when the blower is removed, the secondary heat exchanger should be checked for dirt.
The video below covers how to clean the blower wheel and secondary heat exchanger
If the furnace is a 90% efficient one, when the blower is removed, the secondary heat exchanger should be checked for dirt.
The video below covers how to clean the blower wheel and secondary heat exchanger
13, Oil the fan motor and blower wheel. Most newer blowers are direct drive. The oilers (if there are any) are on either end of the motor.
Most modern motors with oilers just have a plug on either end of the motor that must be removed and oiled inside.
The video below shows how to do this.
Most modern motors with oilers just have a plug on either end of the motor that must be removed and oiled inside.
The video below shows how to do this.
Some older furnaces have a belt drive blower that also has oilers that need to be oiled.
14, Clean the return plenum. This is just good workmanship to bring a shop vac and clean the return plenum.
15, If the furnace has an inducer fan, its bearings should be checked for tight or loose. If the bearings have oilers, they should be lubricated. Also, the amp draw should be checked and compared to the rating plate on the motor. Amp draw should be at or less than rated.
15, If the furnace has an inducer fan, its bearings should be checked for tight or loose. If the bearings have oilers, they should be lubricated. Also, the amp draw should be checked and compared to the rating plate on the motor. Amp draw should be at or less than rated.
16, If the furnace is 2 stage, fire off the second stage.
This is a little bit harder than it may seem. There are 2 ways to set up a 2 stage furnace. You can wire it so the first and second stage (W1 and W2) are wired together.
This will start the furnace in low fire. The furnace will run for approximately 10 minutes, then will go to high fire.
You could also have a 2 stage thermostat that will start first stage, then if the temperature continues to drop in the structure, will go to second stage.
If you set the thermostat more than about 3 degrees above the ambient temperature, both stages will be energized.
To get the furnace to operate in second stage, disconnect W2 from the furnace control board.
Fire off the furnace. First stage will start. Check amp draw of inducer and circulating fan. Once the furnace is operating in first stage, connect W2 to the thermostat wire. You will not have to wait the 10 minutes, the second stage will start immediately. You can then check the amp draw of the motors and the operation of the second stage burners.
17, Check delta T. Here you are checking to see if the temperature rise is within specs. The maximum temp rise is listed on the manufacturer's model plate. This is a maximum temp.
A target temperature is around 120F supply with a 65 to 70F return.
A target temperature is around 120F supply with a 65 to 70F return.
18, Here we are checking the operation of the limit switch. The limit switch is there to stop the burners if the temperature inside the furnace gets too high.
The only accurate way to check this is to disconnect a wire from the circulating fan and start the burners.
The burners should shut down within 5 minutes (most will shut down within 2 minutes).
The only accurate way to check this is to disconnect a wire from the circulating fan and start the burners.
The burners should shut down within 5 minutes (most will shut down within 2 minutes).
19, This is a check of the pressure switch operation. If the pressure switch (or the centrifugal switch) does not make, the unit should not light the burners. Most of the newer units have an automatic check to see if the pressure switch made, but it is good to check the operation by removing the the tubing from the pressure switch while the unit is operating. The flame should shut down.
20, If the furnace is a high efficiency furnace that condenses water from the gas, you need to clean the condensate drain. These drains sometimes collect dust and algae from the high humidity vent gas. The video below shows how to clean the condensate.
21, If the furnace vent is metal, you should check for rust. Using a screwdriver to try to penetrate the vent pipe from the bottom will determine if it is rusted out.
22, With any gas service, you should be checking for gas leaks. Your nose is the first check. Any gas smell and you should be checking for leaks with an electronic detector. Certainly all tubing that has been removed and reinstalled should be checked for leaks.
23, This last check is to be sure you have not left anything undone. If the furnace is running when you leave the furnace room, you know you have not forgotten anything.
